usb rubber ducky using arduino pro micro / arduino leonardo
What is USB Rubber ducky?
The USB Rubber Ducky is a keystroke injection tool disguised as a generic flash drive. Computers recognize it as a regular keyboard and accept per-programmed keystroke payloads at over 1000 words per minute.
Originally developed by Hak5
https://www.hak5.org/
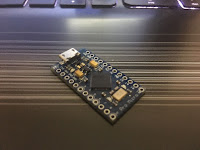
Yes it is possible to mimic Rubber ducky all you need is Arduino compatible board i chose arduino pro micro because of it size and performance.
Things you need :

1.Arduino pro micro

2.Micro USB Cable - A to Micro B
3. OTG adapter
4.Soldering machine,flux,lead
Software Required
Download these software's from the above link.
step 1: open Arduino.exe ,
- Navigate to Tools-->Boards-->arduino leonardo.
- Tools-->Select corresponding port.
Step 2: Unzip Duckuino and open index.html it will open in the browser
hint : Make sure you are connected to internet while compiling if you don't have internet else the code will not compile.
Step 3: Paste the following commands in the input area
WINDOWS
DELAY 200
STRING cmd
DELAY 200
ENTER
DELAY 200
STRING ipconfig
DELAY 200
ENTER
Step 4: Click on compile button
Step 5: Click the copy button to copy the script
Step 6: Go back to the Arduino ide and replace the code that you copied
(CTRL + V)Step 7: Click the upload button in the arduino ide and the code will be uploaded to the board , after seeing successfully uploaded status in the ide unplug the device.
Step 8:if you plug in the device the windows cmd prompt will open and ipconfig info will show and matter of milliseconds as the device is pluged in.
Step 9: breakdown the OTG adapter and de-solder the pins TYPE -A and TYPE-B Seperately
Step 10: Done!!!!!!!


It won't let me compile
ReplyDeletesame here
Delete